Why Exigent?
With more than three decades of experience, Exigent is not just about assembling pieces; we're about turning your strategic vision into reality. Our tech stack is not a one-size-fits-all solution; it’s a bespoke solution crafted with the unique solutions for your success.
Let’s collaborate to create the perfect tech stack for your business’s technology needs. Together, we’ll ensure your IT supports your ambitions, enables growth, and adapts to future challenges seamlessly.
Whether you are replacing your current IT partner, researching whether managed services is right for you, or looking for a partner to collaborate with an in-house IT team, Exigent has the answer.
To start, your organization is paired with an experienced Technical Advisor who guides your IT journey
Establish IT Foundation
- Select level of Assurance managed services
- Understand business challenges & goals
- Evaluate current IT environment

Deploy & Stabilize
- Guided onboarding
- Assume management of IT
- Stabilize your environment on Assurance

Develop & Execute
- Collaborate on your IT roadmap
- Align tech strategy with business goals

Optimize & Advance
- Long-term view of technology
- Continuous monitoring
- Performance analysis

Evolve & Scale
- Consultative business reviews
- Customs strategic roadmap
- Re-assess and refine
- Future-proof IT environment

Let's Build Your Custom IT House
Why Does Exigent Service Consistently Score High with Customers?
You’re never just a number.
Frustrated with repeatedly explaining problems to helpdesk engineers who don’t know anything about your business? Tired of being a ticket number with your MSP, and talking to a different engineer on every single service call?
With Exigent, the one-on-one attention your organization enjoys during onboarding and the deeply personalized partnership led by your dedicated Technical Advisor continues when you interact with our service team. Exigent’s service team further builds on that relationship by pairing your organization with a dedicated group of engineers familiar with your environment, personnel, industry-specific apps and requirements, and business goals. Rather than starting from scratch with every issue or problem, our team gets to know you and your business end-to-end, allowing us to provide a better experience based on efficient and effective service delivery.
When Exigent says we build true partnerships with integrity, we mean that our entire team knows your organization, and you are not just another number on a service ticket with us.
Don't Just Take Our Word For It
Exigent’s mission is to build collaborative, long-term partnerships with our clients. Many of our customers have been working with us for over a decade – including our very first customer.
Learn why in their own words.
No-Risk Guarantee
As an Exigent Technologies Assurance customer, you can depend on us—that’s our promise to you.
We’re so confident in our team that we offer a 90-day guarantee.
If you aren’t satisfied with our services in the first three months, you can cancel your contract with no penalty.
Testimonials
Industries We Serve
While Exigent works with many sizes and types of organizations, we have particular expertise in several industries that require unique applications and a thoughtful approach to cybersecurity and compliance.

We balance innovative technology with high expectations around data security and compliance because IT support for law firms plays a critical role in safeguarding the trusted relationship between lawyers and their clients—even the smallest breach can be catastrophic.
Our team has the expertise to protect your firm from cybercriminals who aggressively target law offices to siphon off client information, including intellectual property, business strategies, and sensitive personal data.

Leveraging our deep expertise in IT services for medical, we design and support solutions that address HIPAA, data accessibility and integrity, strict cybersecurity protocols, high uptime demands, and mobile device management.

Whether you're a small, local organization with simple nonprofit IT demands, or a large, regional nonprofit with multiple locations—Exigent collaborates with your staff to deliver cybersecurity, the systems needed to meet compliance regulations, and IT support for nonprofit success.
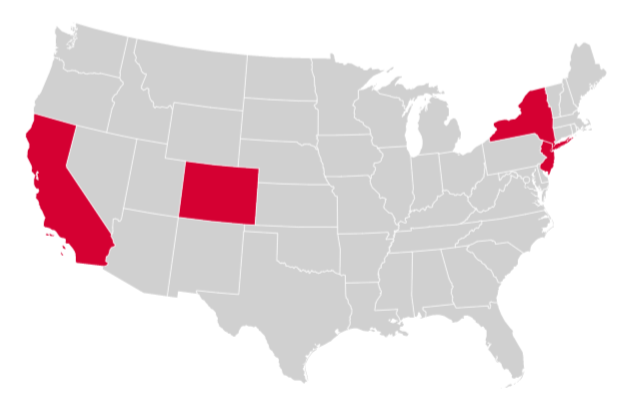
On-Site IT Support Available Near These Locations
Colorado
1800 Wazee St Suite 339
Denver, CO 80202
Phone: (720) 999-9841
California
2029 Century Park E Suite 400 N
Los Angeles, CA 90067
Phone: (213) 797-5600

New Jersey
55 Madison Ave, Ste 400
Morristown, NJ 07960
Phone: (973) 490-4052
New York
845 3rd Ave Fl 6
New York, NY 10022
Phone: (646) 392-8966


