There are several reasons you may want to enable remote management on the public-facing (WAN) interface of a Sonicwall firewall:
For security reasons, you should constrain this type of activity to VPN-connected administrators whenever possible. When VPN is not available, limit Internet access to devices you “trust.” By ticking the box(es) highlighted above, you’re exposing a high-value target to everyone on the internet. In this article, you’ll learn about the rules created on the firewall when you make these selections. We’ll then teach you how to secure your device from dangerous predators.
Enabling the HTTPS Management option creates an automatic “allow” rule on the Sonicwall. The rule grants full access to the WAN management interface (the “ALL X1 MANAGEMENT IP” address object) from ANY source address in the WAN zone (a terrible idea!). This process repeats for other services exposed via the interface such as SSH, PING, and SNMP.
The rules fall into a class called “default,” meaning they can’t be disabled and replaced by one with a more restrictive source (internet) address. You also can’t modify the rule action from “allow” to “deny,” which would let you create a separate “allow” rule utilizing only your “trusted” address list. If you try, you’ll get an error that the rule overlaps the existing default rule.

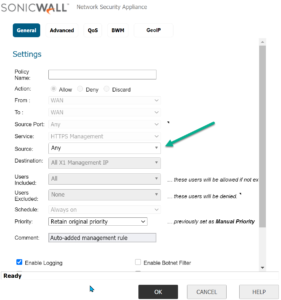
It’s straightforward, and the solution is hiding just under the surface of the rule editor. Editing the default rule will reveal one editable field, and it’s the one you need! You can modify the source address of “ANY” to an address or address-group of your choosing. My suggestion? Firstly, create an address group named “TrustedFirewallManagers.” Secondly, add an address object for each of the trusted source addresses. Finally, add those objects to the group.
Recommendation: I suggest creating the address objects and the associated group before editing the rule. Sonicwall will let you add an address on-the-fly, but not a group. As a result, you’ll save time by building them in advance. The benefit of using a group is that you can add or remove members without modifying the rule itself.
Now that you’ve defined your address group (TrustedFirewallManagers), change the source address in the rule as shown (left). The result is that only the address(es) you trust will have access to the https management service from the WAN. Any address not in your group will pass through to the firewall’s default “deny” rule.
It’s essential to test your new firewall rules to ensure that you’ve done the work correctly. Attempt to access the firewall from an internet-connected workstation. If it’s in your group, it should work, and, if not, it should fail.
Check with your MSP or deployment engineer if you’re not sure how to determine the proper IP address(es) for your group. If you get stuck, feel free to reach out!